Here's How To Easily Clean Up Your Windows Drive For Optimal Performance
Start With Clearing Out Old Programs
We will start with what is usually the easiest process, culling software that is no longer needed. In Windows 10 and 11, installed programs can show up in a couple of different places depending on their type. The old mainstay “Add or Remove Programs” still exists under Control Panel. However, this listing does not show the new UWP apps from sources like the Windows Store. Instead, we will head to Windows Settings, and then dive under “Apps & features.”By default, this will list installed programs in alphabetical order. The "sort" option at the top can let you change this to arrange by installation size or date. You can use this to quickly spot larger applications or target older installations you may have forgotten about. The filter option is handy if you have programs installed across multiple drives so you can target just the drives that need some breathing room.

In my case, I no longer use this AVerMedia capture card in favor of the EVGA XR1. This is therefore an easy target for removal. Some applications can uninstall directly from this menu, while others will direct you elsewhere. For instance, most x86 applications will redirect to the Control Panel for uninstallation while Steam games will pop through to your Library. Most applications occupy kilobytes to megabytes worth of space but clearing old games can often net gigabytes of savings.
Tackle Junk Files Automatically
The next area to tackle is all the junk files your system accumulates over time. This can take the form of Temporary files generated by applications like web browser which can be safely discarded, old update files, prior operating system versions, and more. We will also rope in the Downloads folder to this section, which is often packed with things you either no longer need or can easily download again. Before moving on, browse to your Downloads folder and move anything important elsewhere as the next step is rather indiscriminate.Windows 10 added a Storage Sense tool to help tackle these accumulations. It can be accessed by opening Windows Settings, then going under System followed by Storage. First, configure preferences for how long items should be held in the Recycle Bin and Downloads folder. These can be set to Never. However, we recommend 30 and 60 days respectively as you really should not be storing anything important in these folders long-term. Storage Sense also operates in conjunction with OneDrive to free up local space keeping your files in the Cloud with similar retention options.

Chase Down All The Junk
You can also try the Disk Cleanup tool for a more in-depth and manual alternative. To access this, click the Start button and type “Disk Cleanup” – just start typing and the search box will appear – then click the Disk Cleanup icon. If prompted, choose your target drive to clean up and click OK. This tool will show a long list of options to select, but it is not yet comprehensive. If you are an administrator for the computer, you can click the “Clean up system files” button to target even more locations.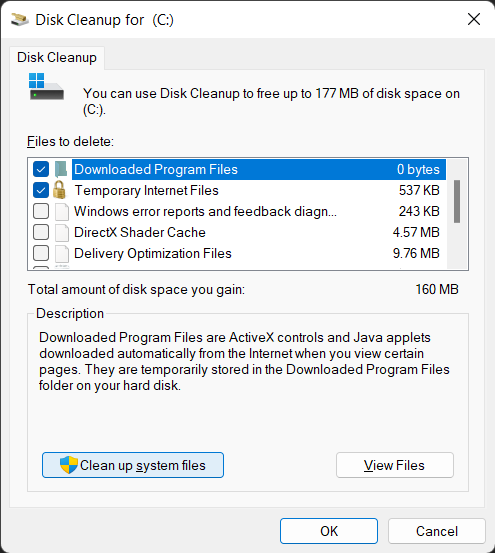
Every option available even as an Administrator can be safely selected without harming your computer. Just be sure you do not need to revert your Windows version or save something from the Recycle Bin first. Each line will indicate how much disk space it contributes with a total amount to be saved by your selections below.
Now Face Your Data Hoarding Addiction
The tools above are not sufficient to deal with the biggest problem. Data hoarding like a packrat can only be combatted through manually tracking down the files you no longer need. That does not mean you need to go it alone. Several applications exist to help you visualize where the bulk of your data is hiding.
You may have noticed that Windows attempts to provide you a breakdown of your data into different categories in the process above. For example, Settings > System > Storage shows my computer has 826 GB of video, 324 GB occupied by Apps & features, 73.6 GB residing locally from OneDrive, and 491 GB of “Other” data. Is it helpful? Maybe, but we can do much better.
Enter WizTree disk analyzer. This free application scans your desired storage drive or folder. It then creates various views of your data. The default tab is Tree View which maps all the drive’s folders and reports on their size and relative amount of drive space consumed. For our purposes, we actually want to look at the Allocated column rather than Size. In cases like OneDrive, the Size column shows what the capacity used by all files would be if they were all locally available. It is useful if you want to trim down your cloud storage as well but Allocated shows the true amount of space currently used on disk.

In my case, this revealed a Photos folder at the root of my C: drive consuming 434.7 GB of space. As it turns out, this folder was a backup I created when moving files around to support new HDD’s in my Synology NAS. I do not need them stored locally anymore, so I can clear those out.

I also see my Users folder in general measures 2TB in size while consuming just over 1TB of local disk space. I can drill down with the lefthand plus button to see most of this is coming from Videos. I do not need 827.0 GB of video footage stored locally on my system. This is a perfect candidate to move over to my NAS for archiving which can now hold 16TB.

For another visualization, the bottom of the window depicts each file by size and directory. Larger squares or rectangles indicate larger files. If your goal is just to find individually large files, click on the File View tab instead of Tree View. The File View tab is a sortable list of all files which defaults to arrangement by size. Here I can see my Videos folder contains many individual multi-gigabyte files I could choose to individually cull if I did not have my archive NAS.
What To Do Next
After all this, it is probably worth taking a moment to tune up your system as well. Windows has a habit of letting its system files get corrupted, but this simple command can patch it right back up. You will also want to make sure your security settings are correct and that your antivirus is not burning up system resources without your knowledge. You may even want to make Windows feel more personal with this desktop customization guide.We hope these techniques can help you reclaim some of your precious disk space. Be sure to toss the developers a donation to continue the great work if you found WizTree helpful. We have no affiliation with WizTree-- we just like it. If you want an alternative to WizTree, we have also enjoyed TreeSize. However, it does not scan as quickly, nor does it provide the helpful visual depiction at the bottom. Of course, if you would like to see more guides like this one or to support our independent journalism, consider contributing to our Patreon.