ASUS Z87 ROG Motherboard Roundup: Enter Maximus VI
UEFI and Overclocking
For all the extra software and on-board goodies ASUS brought forth for its Z87 ROG motherboards, one of the features of the boards that the company is clearly proud of is the UEFI BIOS. Ever since the industry moved to a more graphical, more user-friendly BIOS, ASUS has been working to make its UEFI experience the best it can be. This generation does not disappoint.
As before, there is both an EZ Mode and an Advanced Mode. In EZ Mode, you’re greeted (or perhaps “blasted” is a better term) with loads of information that includes the time and date, fan speeds, CPU voltage, temperatures, boot order, DRAM information, system information, and more. Joking aside, it does offer a nice at-a-glance look at your system, and you can select different presets to adjust system power, too.

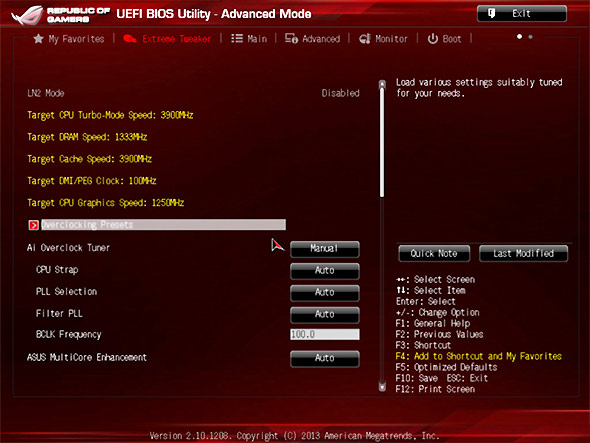
Advanced Mode has all the features you’ve come to expect from a UEFI BIOS, and more. The Extreme Tweaker tab is where you can adjust every conceivable CPU, memory, and voltage setting; the Main tab displays the BIOS, CPU, memory, and system information; and the Advanced tab offers up plenty of additional options for fine-tuning and optimizing virtually every other aspect of the system, from the SATA configuration to your ROG Effects.
The Monitor tab lets you keep an eye on voltages, temps, and fan speeds while offering some fan speed controls. And of course, the boot configuration screen gives you all sorts of adjustable parameters for how you want the system to behave when it starts up.
Although it’s somewhat hidden away, there’s a Tool section that contains ASUS’ EZ Flash 2 utility, ROG SSD Secure Erase, ROG OC Panel H-Key Configuration, and more. Unfortunately, the ROG H-Key doesn’t come with the three boards we tested (only the Maximus VI Extreme), but the flash utility is one you’ll definitely need from time to time, and ASUS Overclocking Profile is helpful for anyone who likes to keep settings organized and ready to be deployed with a click or two. The ROG Secure Erase tool is fairly self-explanatory, but it’s worth mentioning that the feature is available.
We want to be abundantly clear here: ASUS’ UEFI BIOS offers myriad and granular ways to adjust, tweak, and goose your system. Taking screenshots of all of it would be an exercise in tedium, but rest assured that the above represents just a basic high level view of what’s available in the BIOS.
Finally, ASUS added a few nifty features designed to enhance the user experience just a bit. One is that you can add items from the BIOS to your My Favorites page, so you can more quickly and easily access the features you use the most without having to hunt for them in their respective tabs and areas.
You can also add Quick Notes so you can remember what in the world you were doing when you adjusted a particular setting or tried out an idea. Another new feature in the same vein is a changelog that tells you what settings you’ve adjusted every time you exit the BIOS; this gives you a quick view of what’s changing, so you’re not surprised by something, and you can even save the logs to a USB flash drive.
For the purposes of this article, we kept things simple, working with just the BCLK and CPU multipliers to see what these boards would let us do. We also used an aftermarket dual-fan cooler (Corsair A70) as opposed to a liquid cooling system.
Predictably, we got nearly identical results with all three ASUS motherboards. The Impact maxed out at 4.71GHz (x47 multiplier, 100.1 BCLK) and scored a 10.18 in Cinebench; the Formula actually fared the same and delivered essentially the same Cinebench score (10.19). It was the Gene, actually, that gave us the best headroom (although not by much) with an overclock of 4.72 (x47 multiplier, 100.5 BCLK).
In all three cases, temperatures crept into the mid-80s at our max overclock. One interesting bit to note is that instead of hitting a sort of sweet spot before tapering off in terms of performance and then eventually hitting the BSOD wall as one often sees when incrementally upping overclock settings, these mainboards were all performing better and better before suddenly shutting down; in other words, the boards seems to shut the system down before there was any throttling on the CPU.
And now, let’s dig into our benchmark tests.
;)
As before, there is both an EZ Mode and an Advanced Mode. In EZ Mode, you’re greeted (or perhaps “blasted” is a better term) with loads of information that includes the time and date, fan speeds, CPU voltage, temperatures, boot order, DRAM information, system information, and more. Joking aside, it does offer a nice at-a-glance look at your system, and you can select different presets to adjust system power, too.
;)
;)
Advanced Mode has all the features you’ve come to expect from a UEFI BIOS, and more. The Extreme Tweaker tab is where you can adjust every conceivable CPU, memory, and voltage setting; the Main tab displays the BIOS, CPU, memory, and system information; and the Advanced tab offers up plenty of additional options for fine-tuning and optimizing virtually every other aspect of the system, from the SATA configuration to your ROG Effects.
;)
;)
The Monitor tab lets you keep an eye on voltages, temps, and fan speeds while offering some fan speed controls. And of course, the boot configuration screen gives you all sorts of adjustable parameters for how you want the system to behave when it starts up.
;)
Although it’s somewhat hidden away, there’s a Tool section that contains ASUS’ EZ Flash 2 utility, ROG SSD Secure Erase, ROG OC Panel H-Key Configuration, and more. Unfortunately, the ROG H-Key doesn’t come with the three boards we tested (only the Maximus VI Extreme), but the flash utility is one you’ll definitely need from time to time, and ASUS Overclocking Profile is helpful for anyone who likes to keep settings organized and ready to be deployed with a click or two. The ROG Secure Erase tool is fairly self-explanatory, but it’s worth mentioning that the feature is available.
We want to be abundantly clear here: ASUS’ UEFI BIOS offers myriad and granular ways to adjust, tweak, and goose your system. Taking screenshots of all of it would be an exercise in tedium, but rest assured that the above represents just a basic high level view of what’s available in the BIOS.
;)
Finally, ASUS added a few nifty features designed to enhance the user experience just a bit. One is that you can add items from the BIOS to your My Favorites page, so you can more quickly and easily access the features you use the most without having to hunt for them in their respective tabs and areas.
;)
;)
You can also add Quick Notes so you can remember what in the world you were doing when you adjusted a particular setting or tried out an idea. Another new feature in the same vein is a changelog that tells you what settings you’ve adjusted every time you exit the BIOS; this gives you a quick view of what’s changing, so you’re not surprised by something, and you can even save the logs to a USB flash drive.
;)
Overclocking
ASUS offers many ways to tweak your system with fine granularity. From the typical BCLK and CPU multiplier options (afforded in part by our unlocked Intel Core i7-4770K Haswell chip) to voltages to fan speeds, you can get lost for days in the BIOS, tinkering and tweaking and poking to milk every ounce of extra performance out of the system.For the purposes of this article, we kept things simple, working with just the BCLK and CPU multipliers to see what these boards would let us do. We also used an aftermarket dual-fan cooler (Corsair A70) as opposed to a liquid cooling system.
Predictably, we got nearly identical results with all three ASUS motherboards. The Impact maxed out at 4.71GHz (x47 multiplier, 100.1 BCLK) and scored a 10.18 in Cinebench; the Formula actually fared the same and delivered essentially the same Cinebench score (10.19). It was the Gene, actually, that gave us the best headroom (although not by much) with an overclock of 4.72 (x47 multiplier, 100.5 BCLK).
In all three cases, temperatures crept into the mid-80s at our max overclock. One interesting bit to note is that instead of hitting a sort of sweet spot before tapering off in terms of performance and then eventually hitting the BSOD wall as one often sees when incrementally upping overclock settings, these mainboards were all performing better and better before suddenly shutting down; in other words, the boards seems to shut the system down before there was any throttling on the CPU.
And now, let’s dig into our benchmark tests.


